快速入门
警告
需要搭建一个 API ?
请确保已经安装 JDK 17, Maven, 和 Docker Engine 🤗
- 我们提供如何安装 JDK 17 和 Maven 的教程
- 我们也提供安装 Docker Engine 的链接
将仓库模版实例化
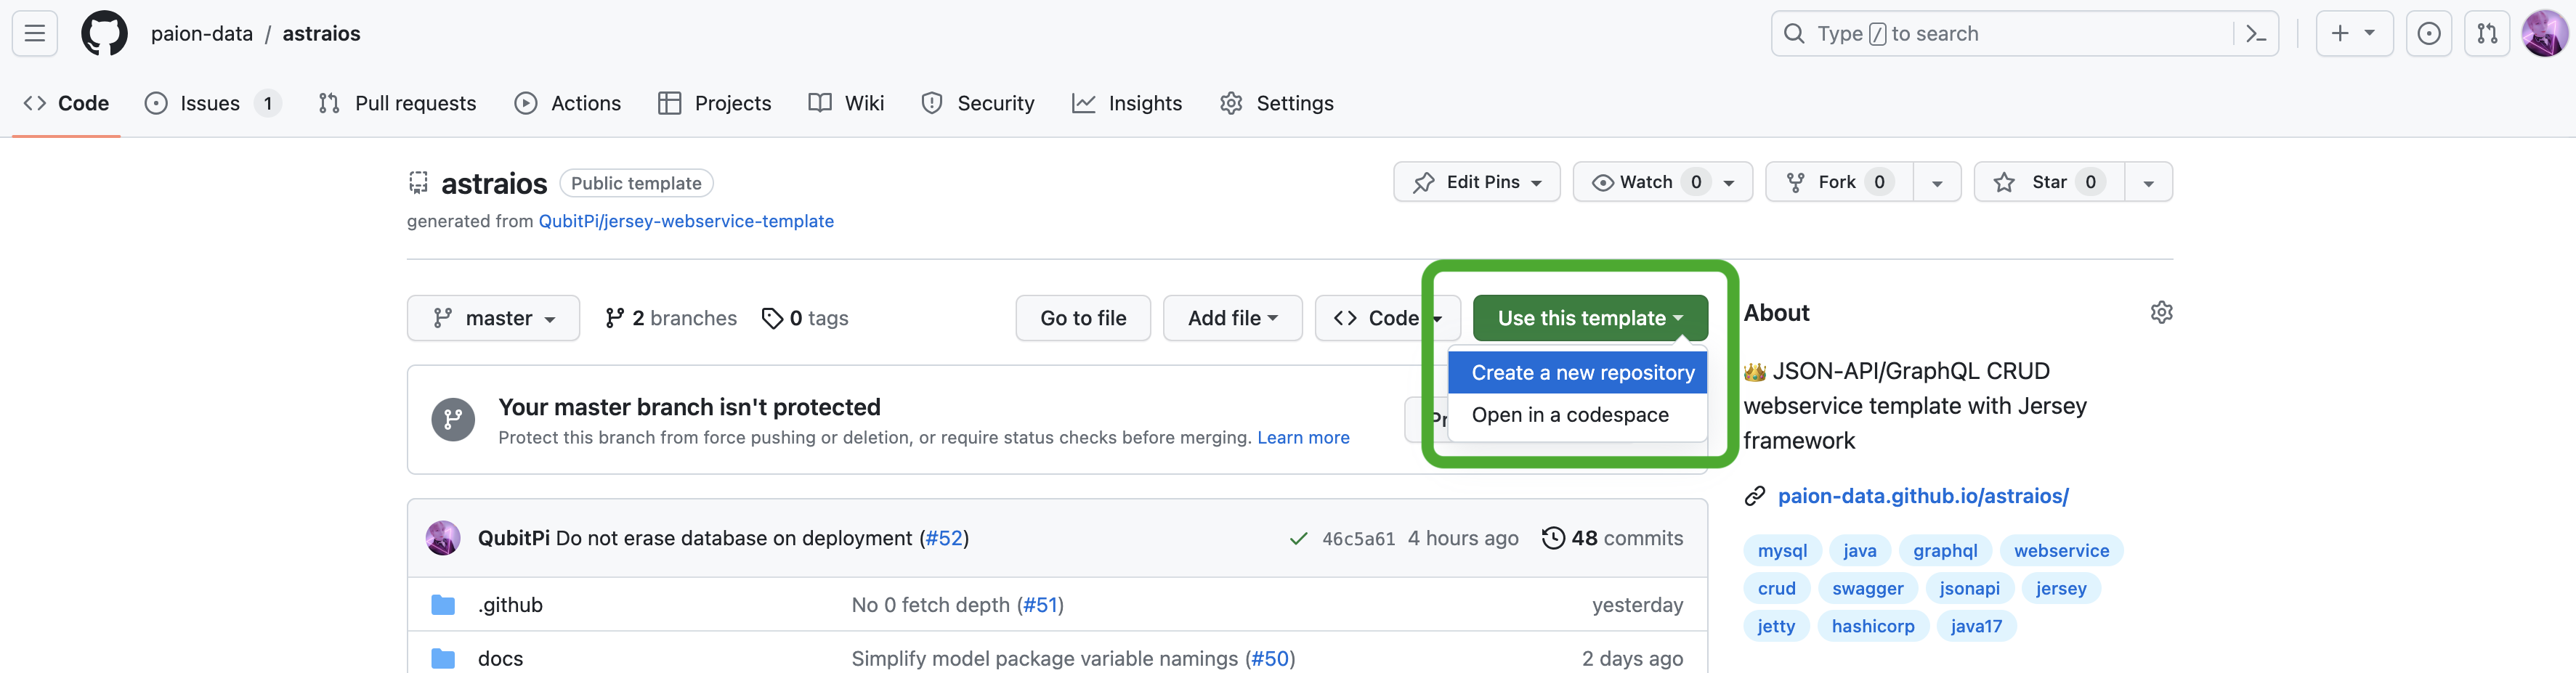
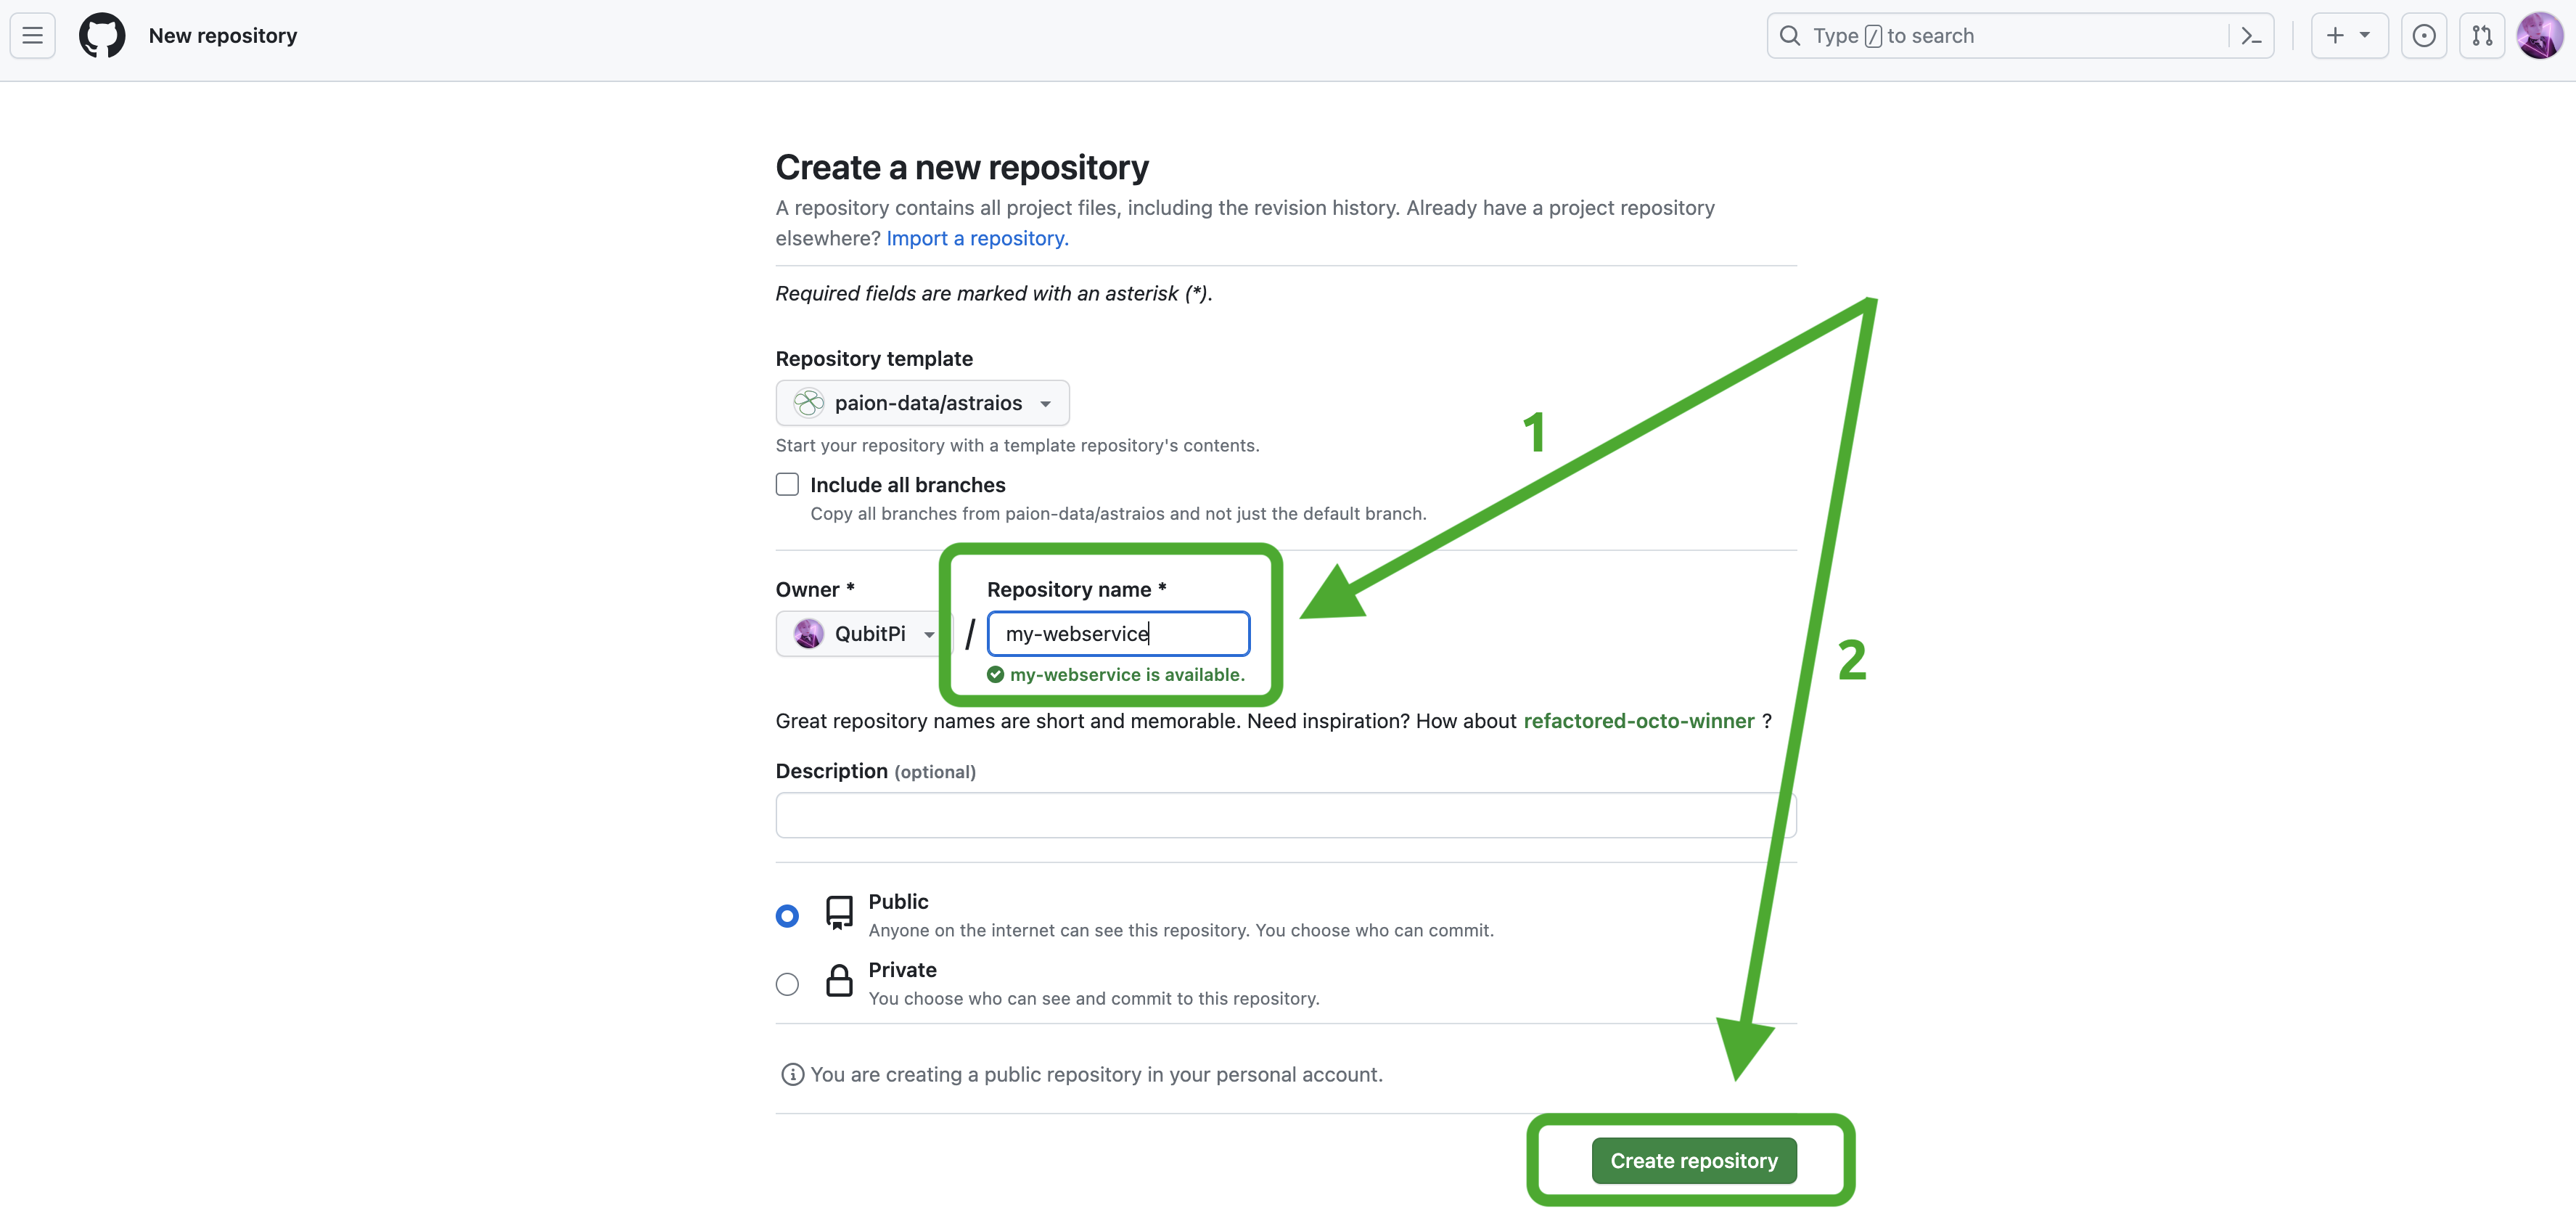
请访问Astraios GitHub,然后执行以下操作之一:
- 使用
git clone https://github.com/paion-data/astraios.git克隆代码仓库,或者 - 用我们自己的 Web 服务名称执行以下操作来将模版实例化:
创建数据模型
Astraios 模型是一个 Web 服务项目中最重要的代码之一。此模型是我们希望公开的数据视图。 在这个例子中,我们将对 book 进行建模,因为大多数人对生活中的书比较熟悉。
我们的 Book 模型大致如下:
import com.paiondata.elide.annotation.Include;

import jakarta.persistence.Entity;
import jakarta.persistence.GeneratedValue;
import jakarta.persistence.Id;
import jakarta.persistence.Table;

@Entity
@Table(name = "book")
@Include(rootLevel = true, name = "book", description = "book entity", friendlyName = "book")
public class Book {

    @Id
    @GeneratedValue
    public long id;

    public String title = "";
}
提示
模型通常打包为一个单独 Maven 项目中的 JAR 文件。以下是一个 完整的示例
最后,运行 mvn clean install 来安装模型
信息
在这之�后,我们使用这个示例数据模型
git clone https://github.com/paion-data/astraios-data-models-example.git
cd astraios-data-models-example.git
mvn clean install
加载数据模型
现在我们有了一些模型,但是如果没有 API 的话并不是很有用。 需要让 my-webservice 通过 Maven 配置文件来 加载数据模型,即 ~/.m2/settings.xml:
<settings xmlns="http://maven.apache.org/SETTINGS/1.0.0"
          xmlns:xsi="http://www.w3.org/2001/XMLSchema-instance"
          xsi:schemaLocation="http://maven.apache.org/SETTINGS/1.0.0
                      http://maven.apache.org/xsd/settings-1.0.0.xsd">

    <profiles>
        <profile>
            <id>astraios-data-models</id>
            <properties>
                <model.package.jar.group.id>com.paiondata</model.package.jar.group.id>
                <model.package.jar.artifact.id>astraios-data-models-example</model.package.jar.artifact.id>
                <model.package.jar.version>1.0.0</model.package.jar.version>
            </properties>
        </profile>
    </profiles>

    <activeProfiles>
        <activeProfile>astraios-data-models</activeProfile>
    </activeProfiles>
</settings>
运行
有了定义的数据模型之后,我们可以运行 my-webservice
cd my-webservice
mvn clean package
MODEL_PACKAGE_NAME=com.paiondata.astraios.data.models docker compose up --build --force-recreate
信息
com.paiondata.astraios.data.models 是之前提到的数据模型包名称
写入数据
插入数据
我们已经定义了数据库视图并通过 HTTP 公开了这些视图。我们接下来可以使用 cURL 将数据放入数据库。
- JSON-API
- GraphQL
- (GraphQL) Query
curl -X POST http://localhost:8080/v1/data/book \
    -H "Content-Type: application/vnd.api+json" \
    -H "Accept: application/vnd.api+json" \
    -d '{"data": {"type": "book", "attributes": { "title": "Pride and Prejudice" }}}'
curl -X POST "http://localhost:8080/v1/data" \
    -H "Content-Type: application/json" \
    -H "Accept: application/json"  \
    -d '{ "query" : "mutation { book(op: UPSERT, data:{title: \"Pride & Prejudice\"}) { edges { node { id title } } } }" }'
mutation {
  book(op: UPSERT, data:{title: "Pride & Prejudice"}) {
    edges {
      node {
        id
        title
      }
    }
  }
}
当我们运行这个 cURL 调用时,应该会看到返回很多 JSON,这就是我们新创建的数据对象!
- JSON-API
- GraphQL
{
   "data":{
      "type":"book",
      "id":"1",
      "attributes":{
         "title":"Pride and Prejudice"
      }
   }
}
{
   "data":{
      "book":{
         "edges":[
            {
               "node":{
                  "id":"4",
                  "title":"Pride & Prejudice"
               }
            }
         ]
      }
   }
}
查看我们的数据
- Web Browser
- JSON-API
- GraphQL
- (GraphQL) Query
只需打开任意浏览器并访问 http://localhost:8080/v1/data/book
提示
建议使用一些JSON格式化浏览器 扩展来查看结果,数据内容更加易读
curl "http://localhost:8080/v1/data/book"
curl -X POST "http://localhost:8080/v1/data" \
    -H "Content-Type: application/json" \
    -H "Accept: application/json"  \
    -d '{ "query" : "{ book { edges { node { id title } } } }" }'
{
  book {
    edges {
      node {
        id
        title
      }
    }
  }
}
更新数据
请注意,我们创建它时并没有设置新书记录的任何属性。用户更新数据和添加新数据一样简单。 使用以下 cURL 调用更新我们的数据。
- JSON-API
- GraphQL
- (GraphQL) Query
curl -X PATCH http://localhost:8080/v1/data/book/1 \
    -H "Content-Type: application/vnd.api+json" \
    -H "Accept: application/vnd.api+json" \
    -d '{"data": {"type": "book", "id": "1", "attributes": { "title": "Emma" }}}'
curl -X POST "http://localhost:8080/v1/data" \
    -H "Content-Type: application/json" \
    -H "Accept: application/json"  \
    -d '{ "query" : "mutation { book(op: UPSERT, data: {id: \"1\", title: \"Emma\"}) { edges { node { id title } } } }" }'
mutation {
  book(op: UPSERT, data: {id: "1", title: "Emma"}) {
    edges {
      node {
        id
        title
      }
    }
  }
}